Start by separating three jobs
Water comes into the living space, water is used at the sink, and wastewater needs a separate collection or disposal route. Treating these as distinct jobs makes a small system easier to understand and maintain.
Walter’s equipment record lists two 5-gallon RV containers for the sink—fresh and gray—a Flojet 2.9GPM pump and a SHURflo accumulator. It also describes a separate 16-gallon rooftop tank, quick-connect hose and outdoor shower arrangement. The rooftop capacity is not part of the sink’s 5-gallon fresh-water figure.
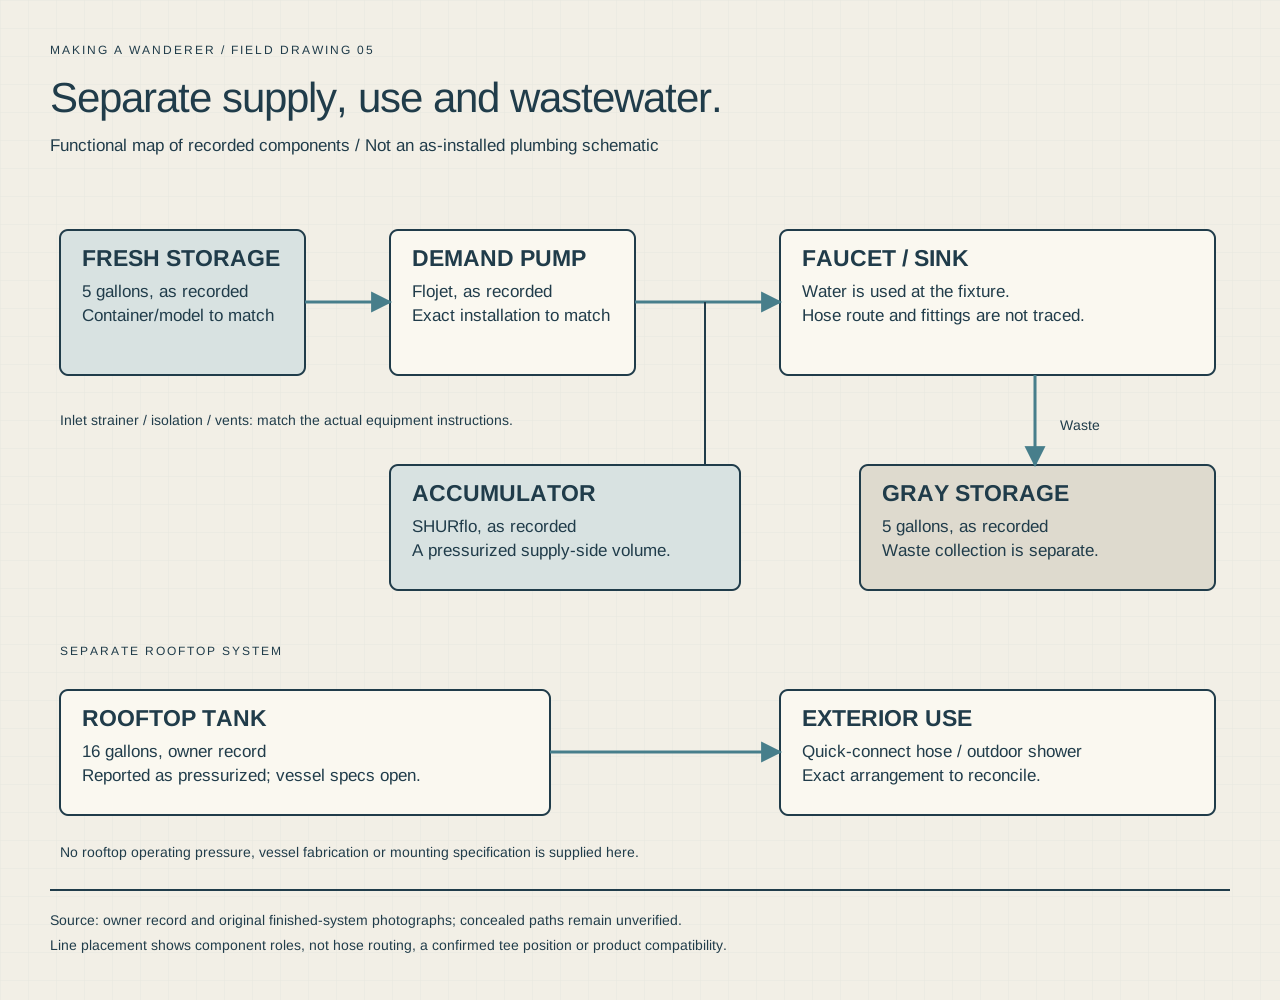
The functional map below shows what those components do. It is not a traced hose-by-hose installation drawing. In particular, the photograph of one accessible container does not identify the function of every visible fitting.
 Enlarge drawing ↗
Functional system map
Supply, use and wastewater
A functional map of the recorded sink and separate rooftop systems. Concealed hose routes and pressure settings remain unverified.
Download sharp vector drawing ↓Planning step
1 / Plan filling, lifting and removal
A removable container needs a path out of the cabinet. Check the door opening, the height needed to lift it and the room required to disconnect its hoses. A container that fits into an unfinished frame may become trapped behind a counter edge, neighboring drawer or seat.
Walter’s photograph shows a narrow access door, a white container and a red retaining strap. This establishes an accessible compartment and visible restraint; it does not establish a tested restraint load or the container’s manufacturer.
For your own build, choose containers and plumbing materials appropriate to the intended water use. Keep fresh and waste systems clearly identified and separate. Record how each container is vented, filled, drained and secured, using the selected product’s instructions.
Planning step
2 / Make the pump and inlet serviceable
The pump moves water from storage toward the fixture. Its inlet side needs an appropriate supply path; its outlet side becomes the pressurized side of a demand-pump system. Make the pump label, connections and any inlet strainer reachable for inspection and cleaning.
A January 2019 shipment notice names a Flojet 03526-144A pump. That is a purchase candidate, not yet a confirmed installed-label match. The manufacturer’s 3426/3526/3626 family guide calls for accessible mounting, flexible reinforced plumbing and a strainer between the tank and inlet. Match the actual pump label before adopting model-specific settings or electrical requirements.
Plan hose bends and connector access before fastening the surrounding cabinet. Leave enough room to inspect a joint without putting strain on the pump ports. Record flow direction on the project drawing so a future repair does not depend on remembering which hose went where.
Planning step
3 / Understand what the accumulator adds
An accumulator adds a pressurized volume to the supply side of the system. Pentair describes its SHURflo accumulator as a bladder-type vessel that can reduce pressure-switch cycling and pulsation. It is not a substitute for the main fresh-water container.
The SHURflo 182-series manual shows both inline and tee-connected arrangements and relates pre-charge to the pump’s turn-on pressure. Walter’s exact accumulator model, plumbing arrangement and pressure settings have not been confirmed, so this guide does not assign a numerical pre-charge or an installed volume.
Keep settings with the system
Record the exact pump and accumulator models, the applicable manuals and any confirmed settings together. A pressure printed on a different model’s web page is not evidence of the setting used in Walter.
Planning step
4 / Give wastewater its own route
The sink drain and gray-water container solve a different problem from the pressurized fresh supply. Keep the waste path accessible for emptying and cleaning, and check the cabinet geometry with the drain hardware installed.
The build record also mentions an exterior gray-water drain. Its precise routing and discharge arrangement are not established by the photographs used here. It is therefore recorded as a feature rather than drawn as a verified connection to a particular container.
For a new conversion, define where wastewater will be collected and how it will be emptied appropriately. Include the drain’s service access, hose routing, venting and closure details in the plan before the cabinet is finished. Do not infer a suitable discharge location from a photograph of a hose connection.
Planning step
5 / Keep the rooftop system separate
Michael’s finished-build record describes a 16-gallon pressurized rooftop tank with a quick-connect hose system and outdoor shower. This is a separate recorded system, with its own filling, mounting and operation questions.
The current archive reconciliation does not establish the vessel specification, allowable pressure, relief provisions, fittings or engineering of the roof mounting. Those are essential to a reproducible construction guide. The diagram identifies the recorded tank and exterior use without supplying a pressure-vessel recipe.
For another campervan, first decide whether the shower needs a separate system at all. Then choose equipment with documented water-use, temperature, pressure and mounting requirements. Keep roof payload and vehicle limits in the same design record.
Planning step
6 / Test the service routine as well as the water flow
Commission the actual chosen components according to their instructions, with joints visible. A first test should make it easy to see where water is moving and to stop the system if something leaks. Check the fixture, pump connections, drain and container interfaces together.
Then rehearse maintenance: emptying containers, cleaning the strainer, isolating the supply and draining the system for storage or freezing conditions. Use the exact equipment’s cleaning, sanitizing and winterizing procedures. This guide does not prescribe chemical concentrations or pressure settings for an unverified model.
- Identify fresh and gray containers clearly.
- Confirm accessible isolation and service points.
- Inspect every joint during operation and after the system rests.
- Check hoses for rubbing, kinks and strain through all cabinet movements.
- Record actual installed models, hose/fitting specifications and settings.
- Keep rooftop-vessel and mounting verification separate from the sink-system drawing.
About these notes
Michael’s record lists separate 5-gallon fresh/gray containers, a Flojet 2.9GPM pump, SHURflo accumulator and a separate 16-gallon rooftop tank. The illustration explains functional roles; concealed hose routes, exact installed models, pressure settings and rooftop-vessel construction remain unverified.